
DIY Modern Farmhouse Fireplace
It’s here, it’s here! I’ve been dreaming of adding a fireplace to our little living room for some time, so I am so excited that it’s finally here, and to share how we did it all with you guys!! And by we, I really mean Jason—He is the magic maker behind all of our projects and I couldn’t be more thankful for his willingness to work on our house projects even after working on house projects all day long!! Haha. But without further ado, let’s get into it!
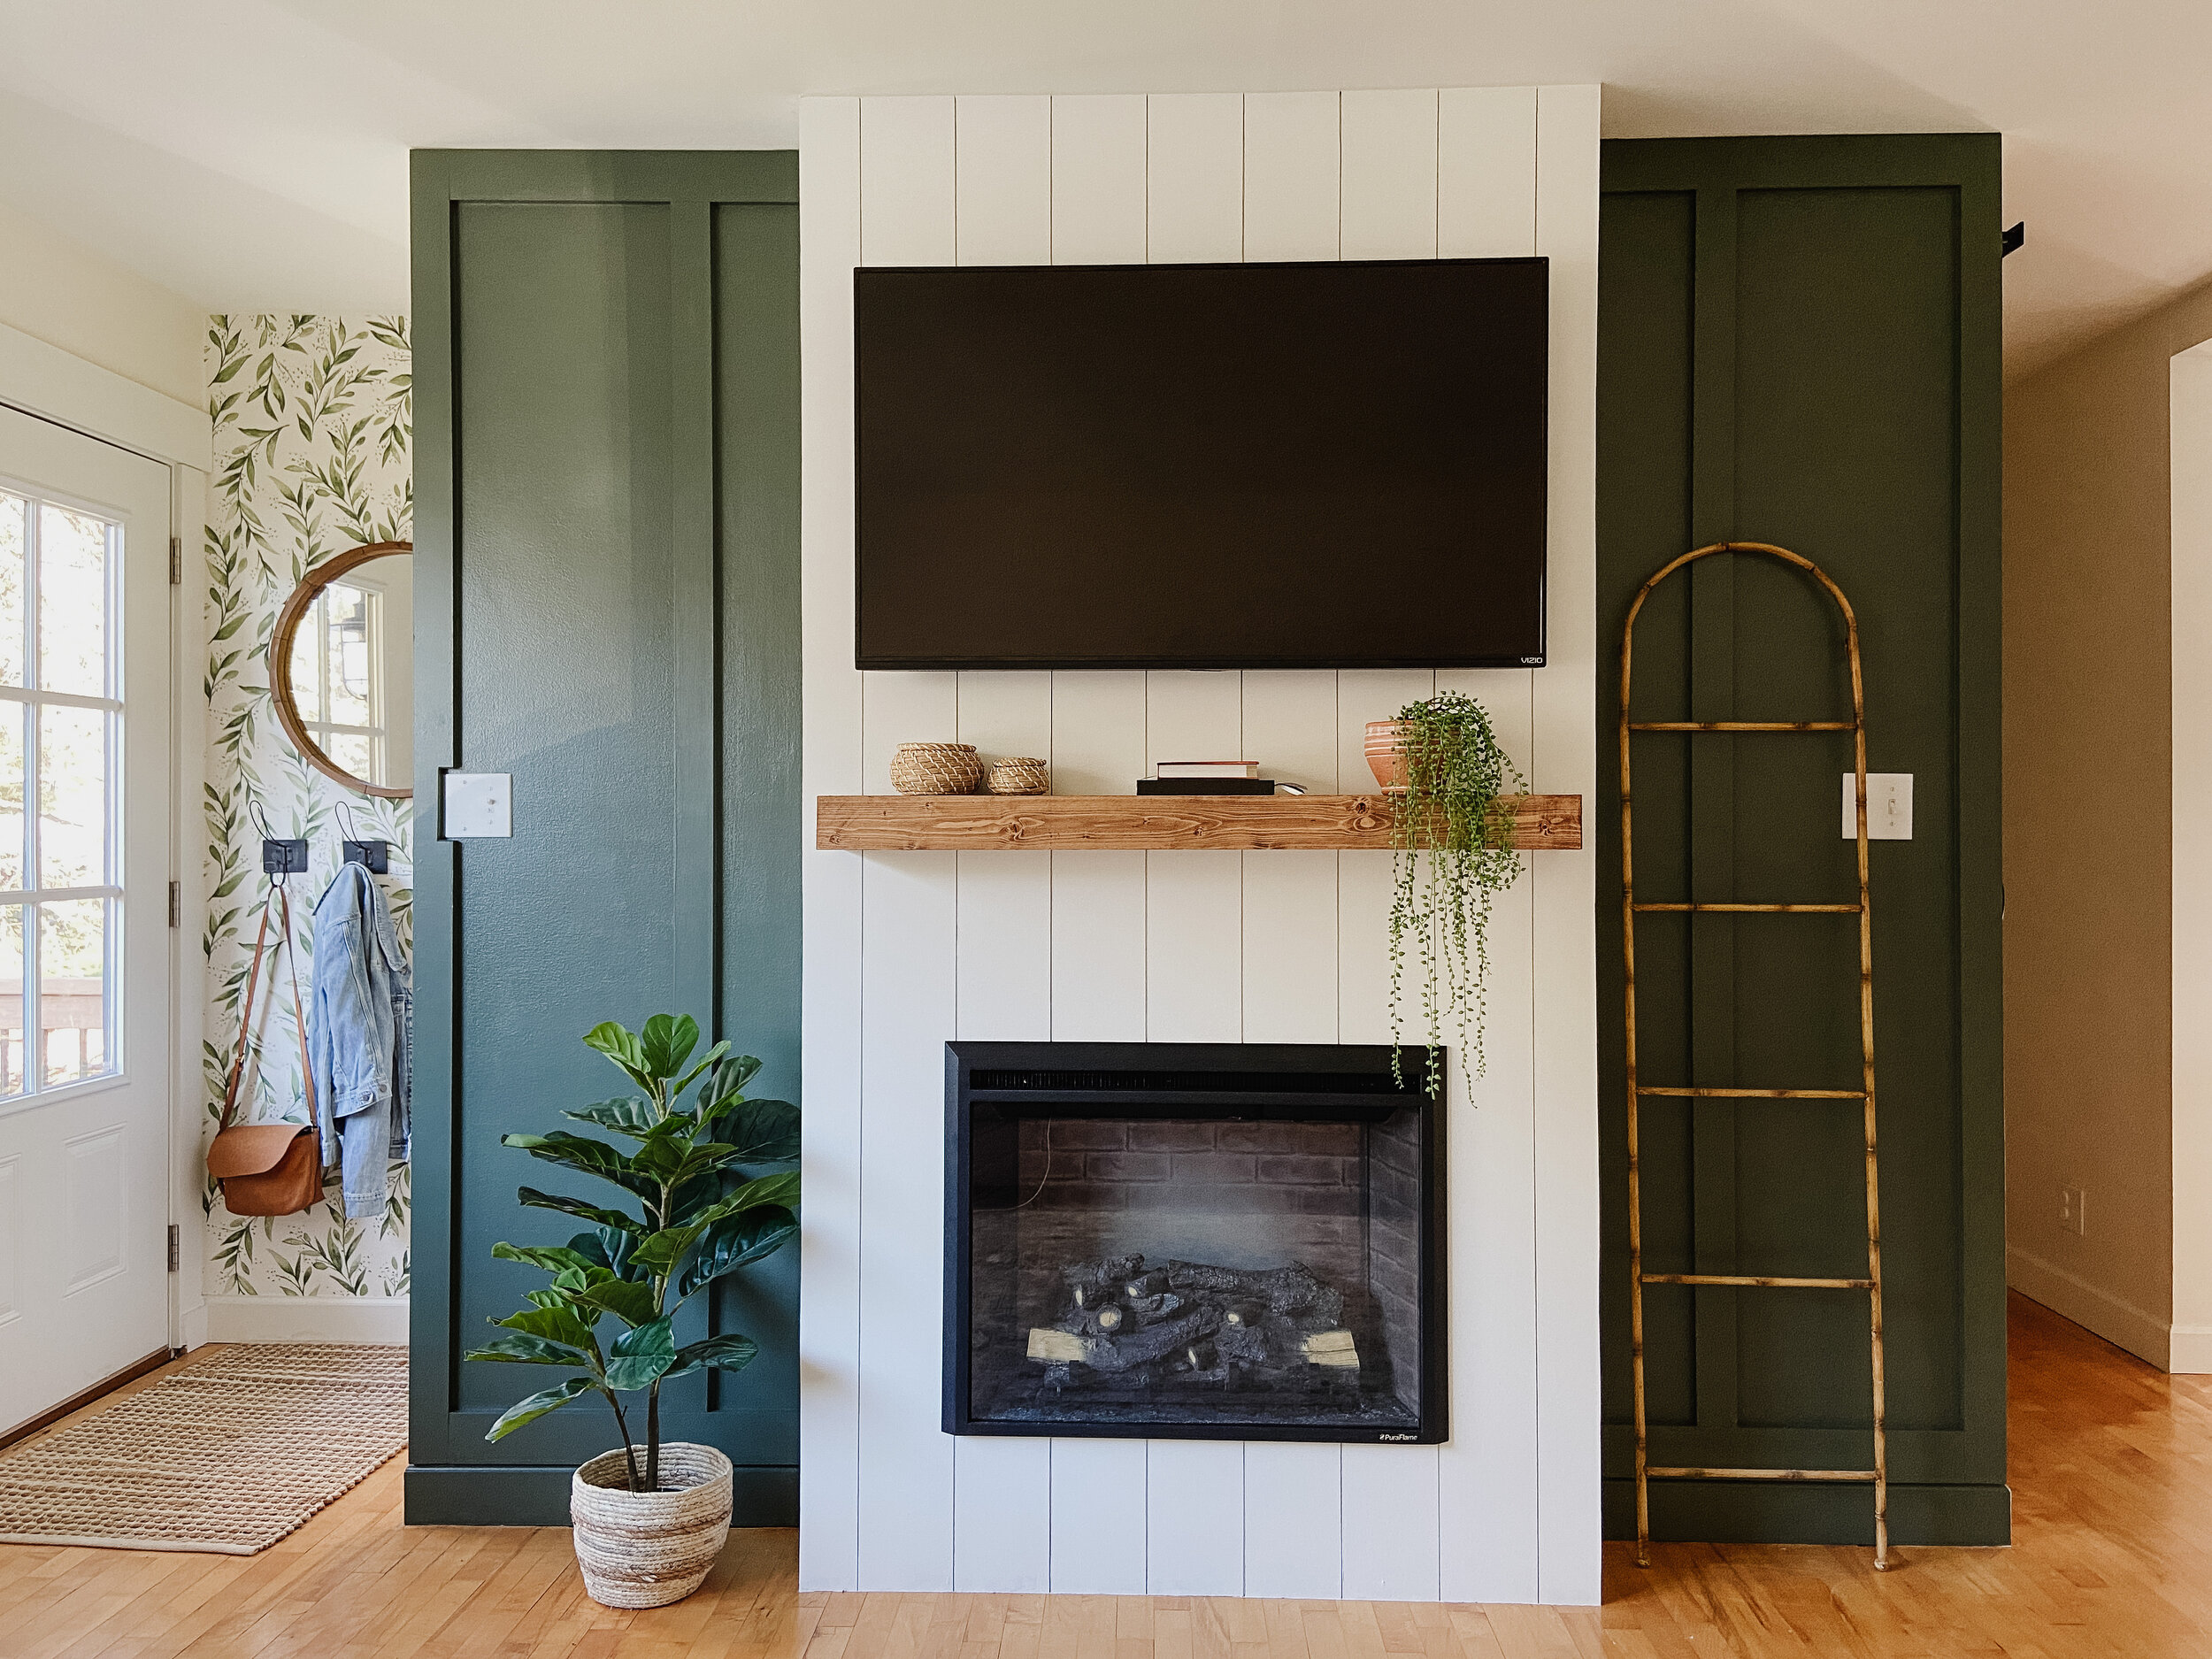
Here’s a look at how this wall looked when we bought our house (4 years ago!), how it looked last week, and how it looks now today!! I’m obsessed!


ABOUT THE FIREPLACE:
The first step to the build was selecting the right electric insert for our space to help determine the scale and dimensions of the fireplace surround. We love the timeless look of a square fireplace, so we decided on the 29” PuraFlame Western Electric Fireplace insert!
From there, we measured out on the wall and decided on the surround would look best at about 50 inches wide. The fireplace needed 8 inches for depth, so the full footprint is 51” wide by 10” deep for some breathing room behind the unit!
The fireplace insert plugs into a standard outlet, and luckily we had an outlet there already so we could simply plug it in through our opening. Jason did add an additional outlet on the fireplace behind the TV so that we could hide the cords!
Note: the tutorial below is based on our exact build, so the specific dimensions and details may vary when recreated for your home. The material list and total cost is listed at the bottom of the post!
building the FRAMe:
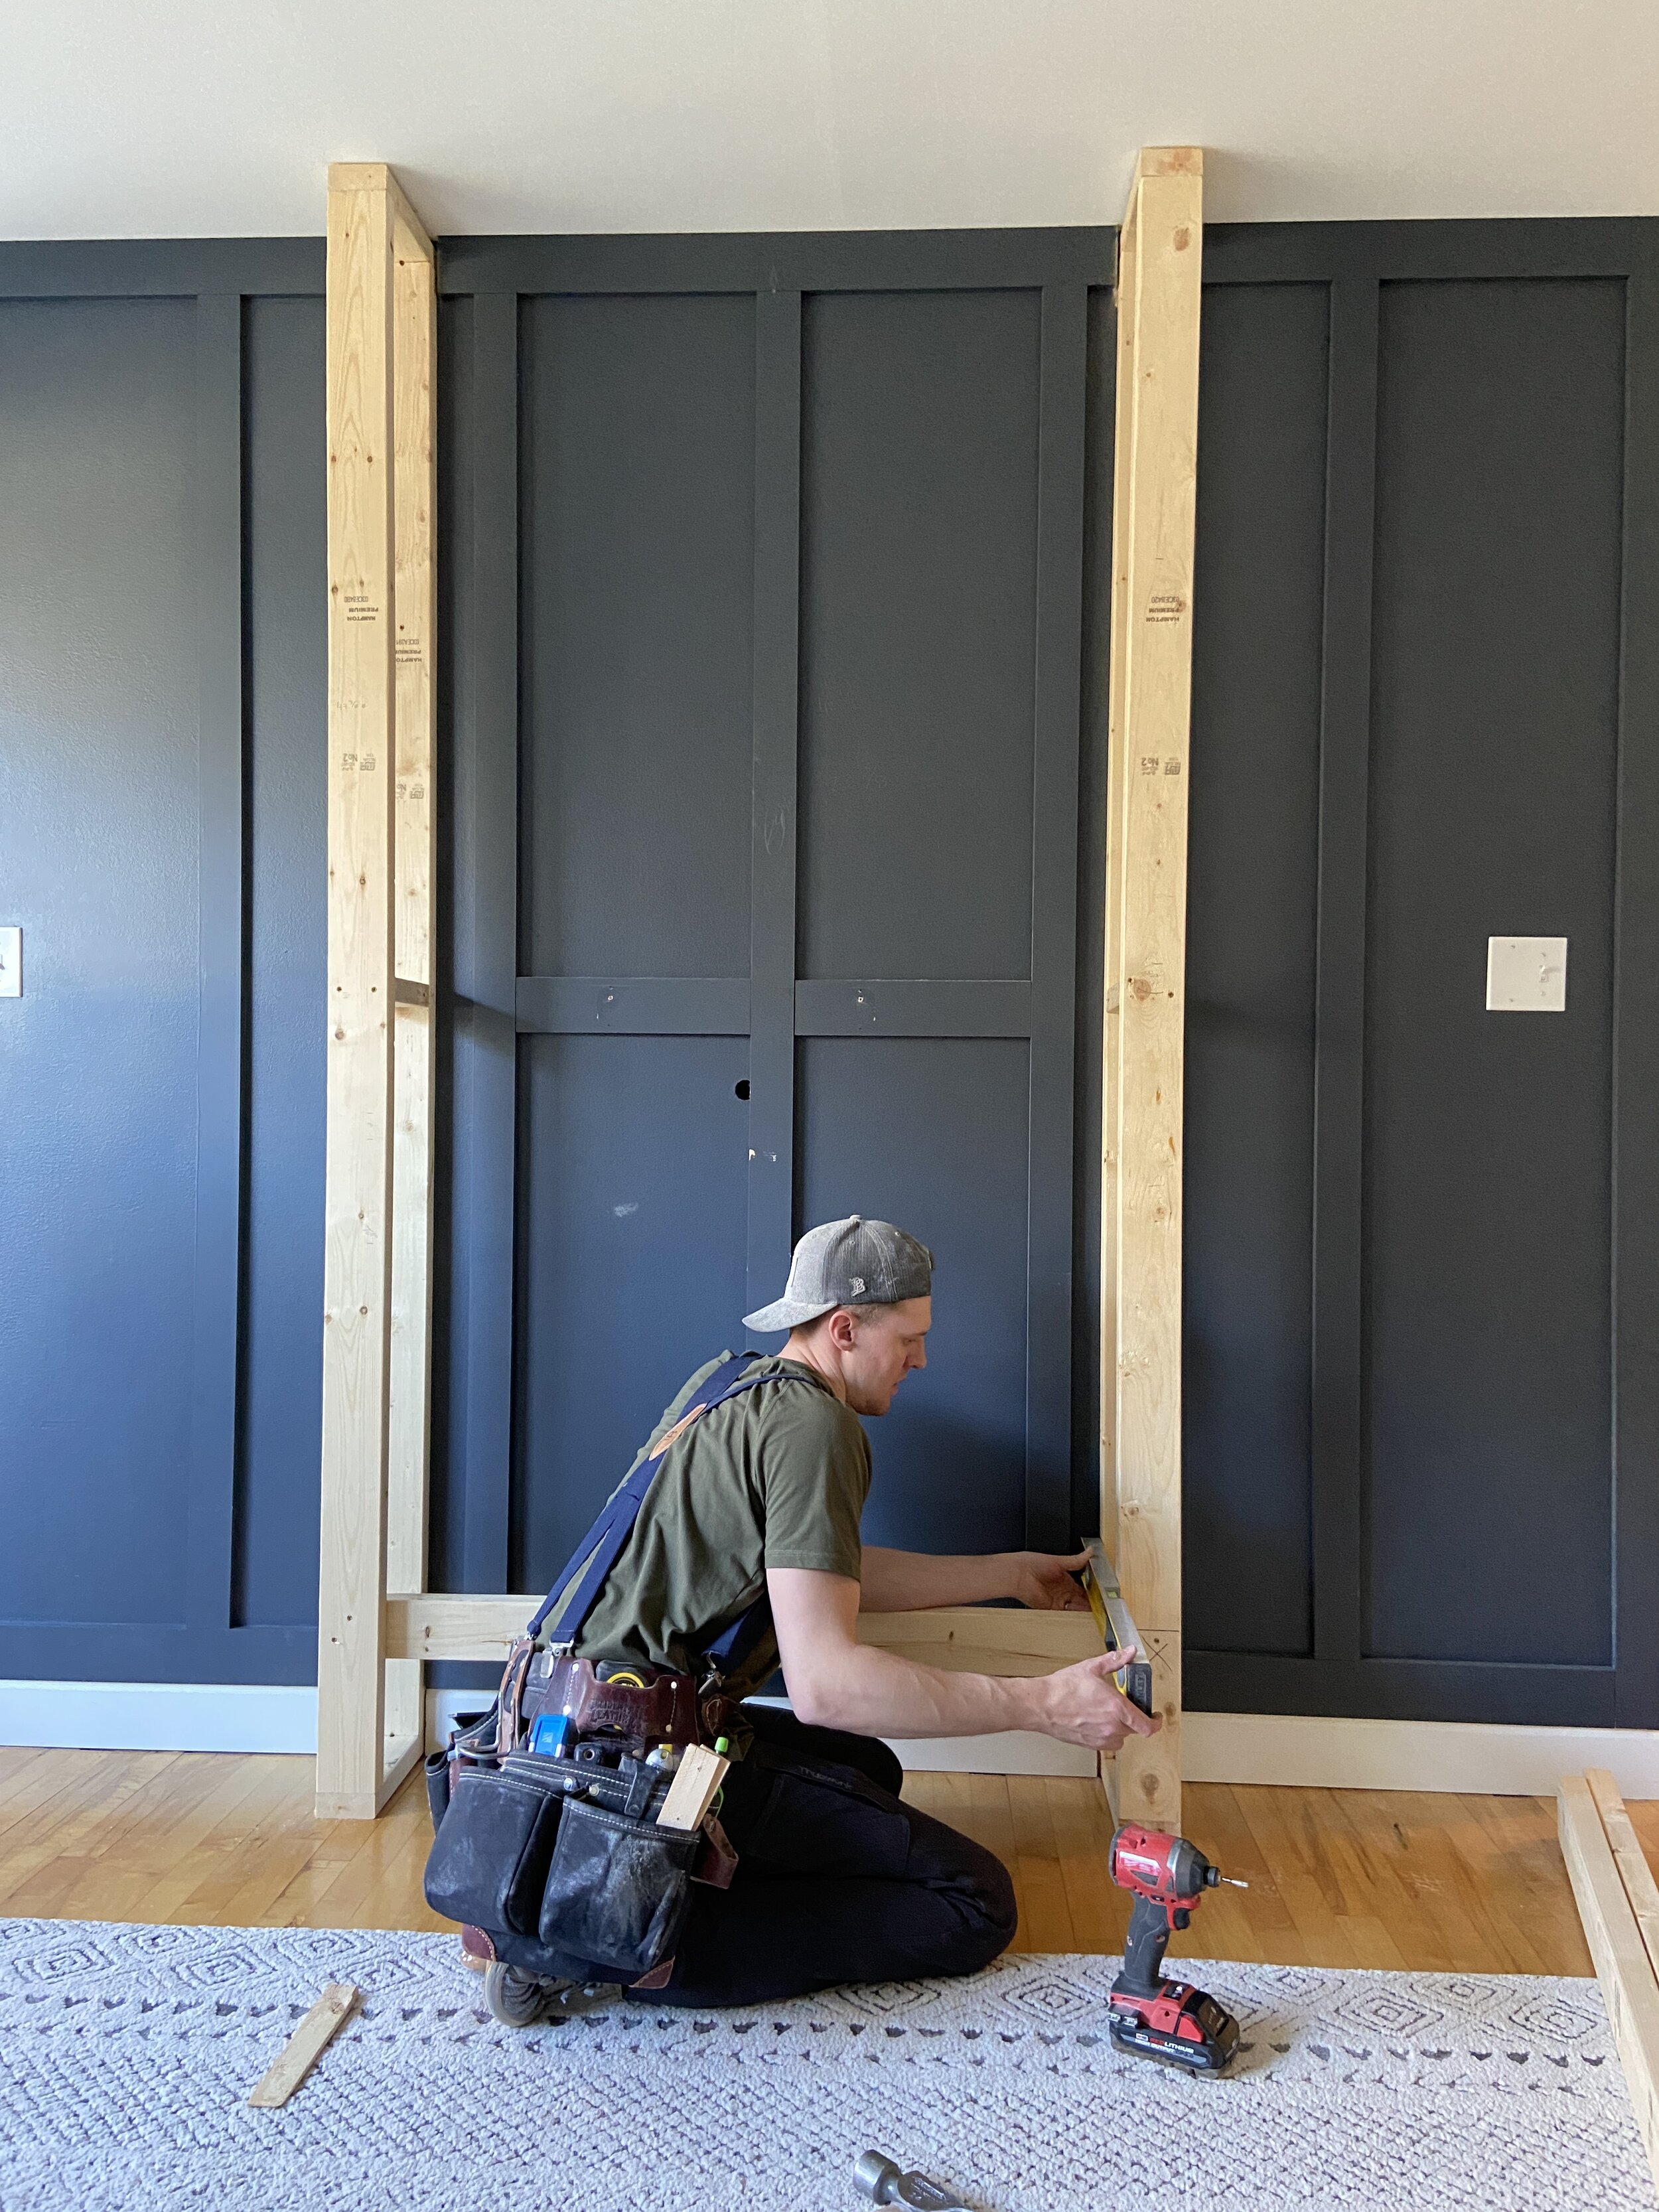
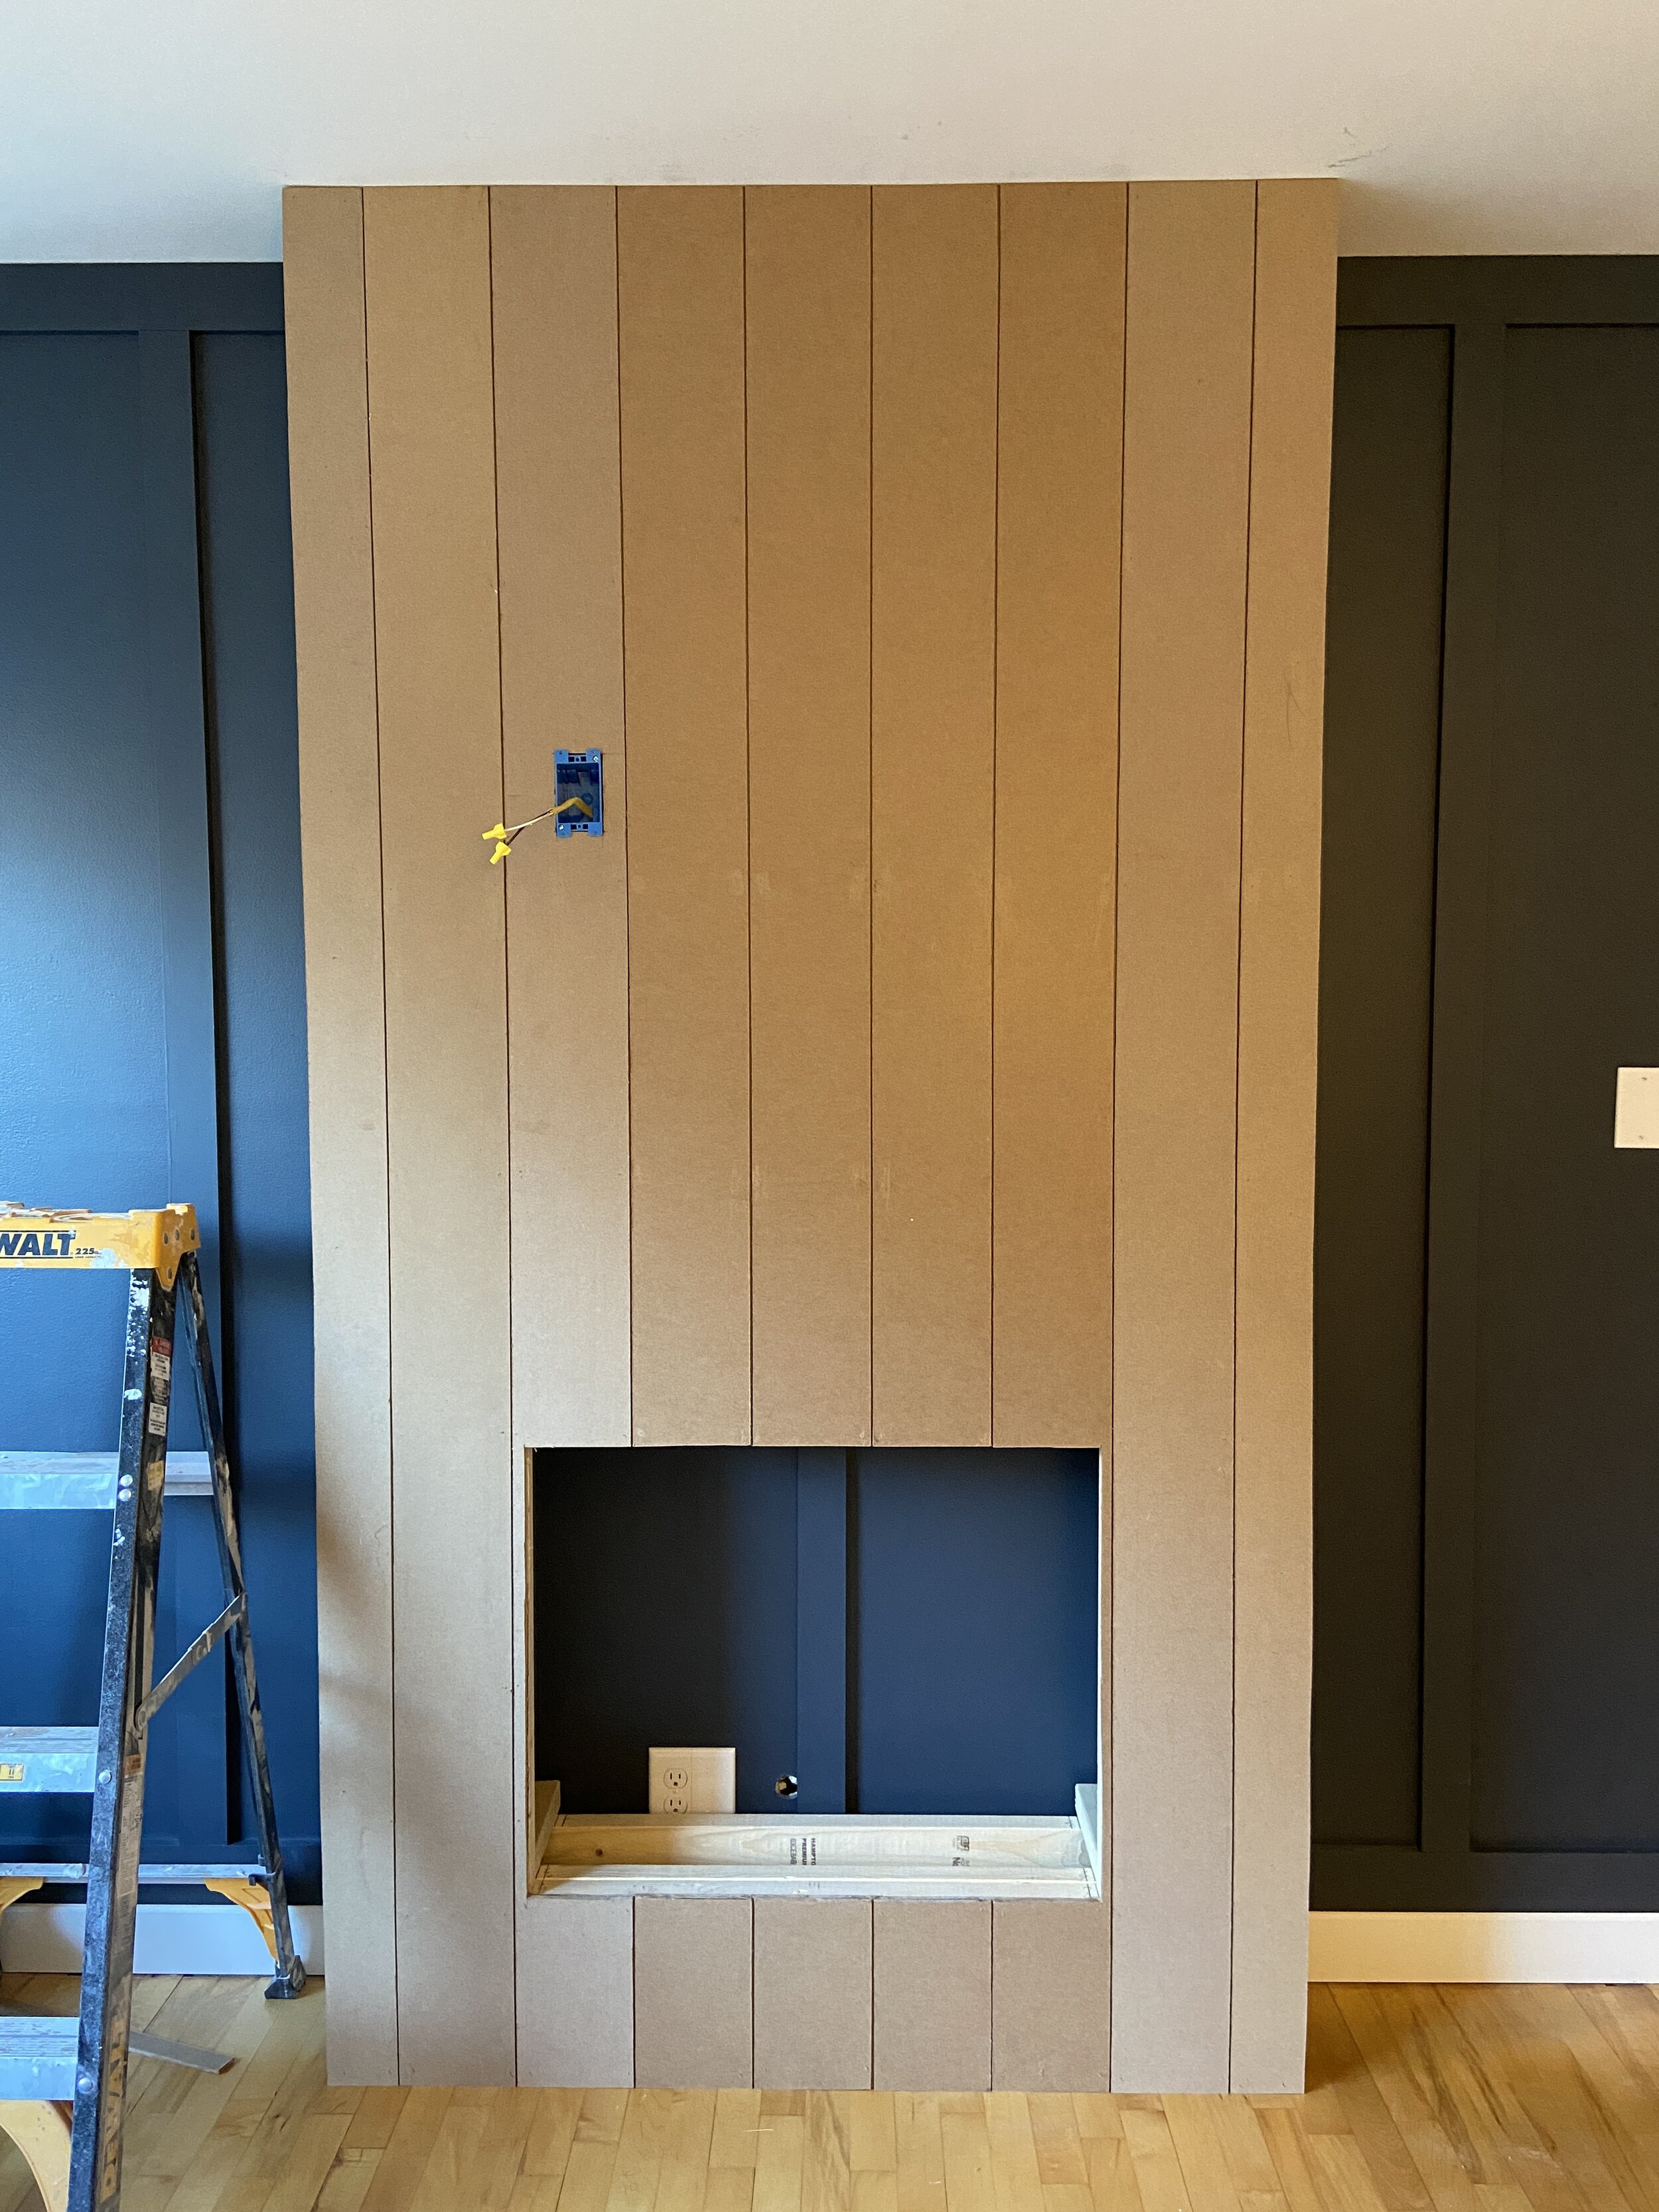
First we framed the side walls with two studs per side. The top and bottom plates were cut to 10 inches long. We used the two studs per side to span the distance between the floor and the ceiling.
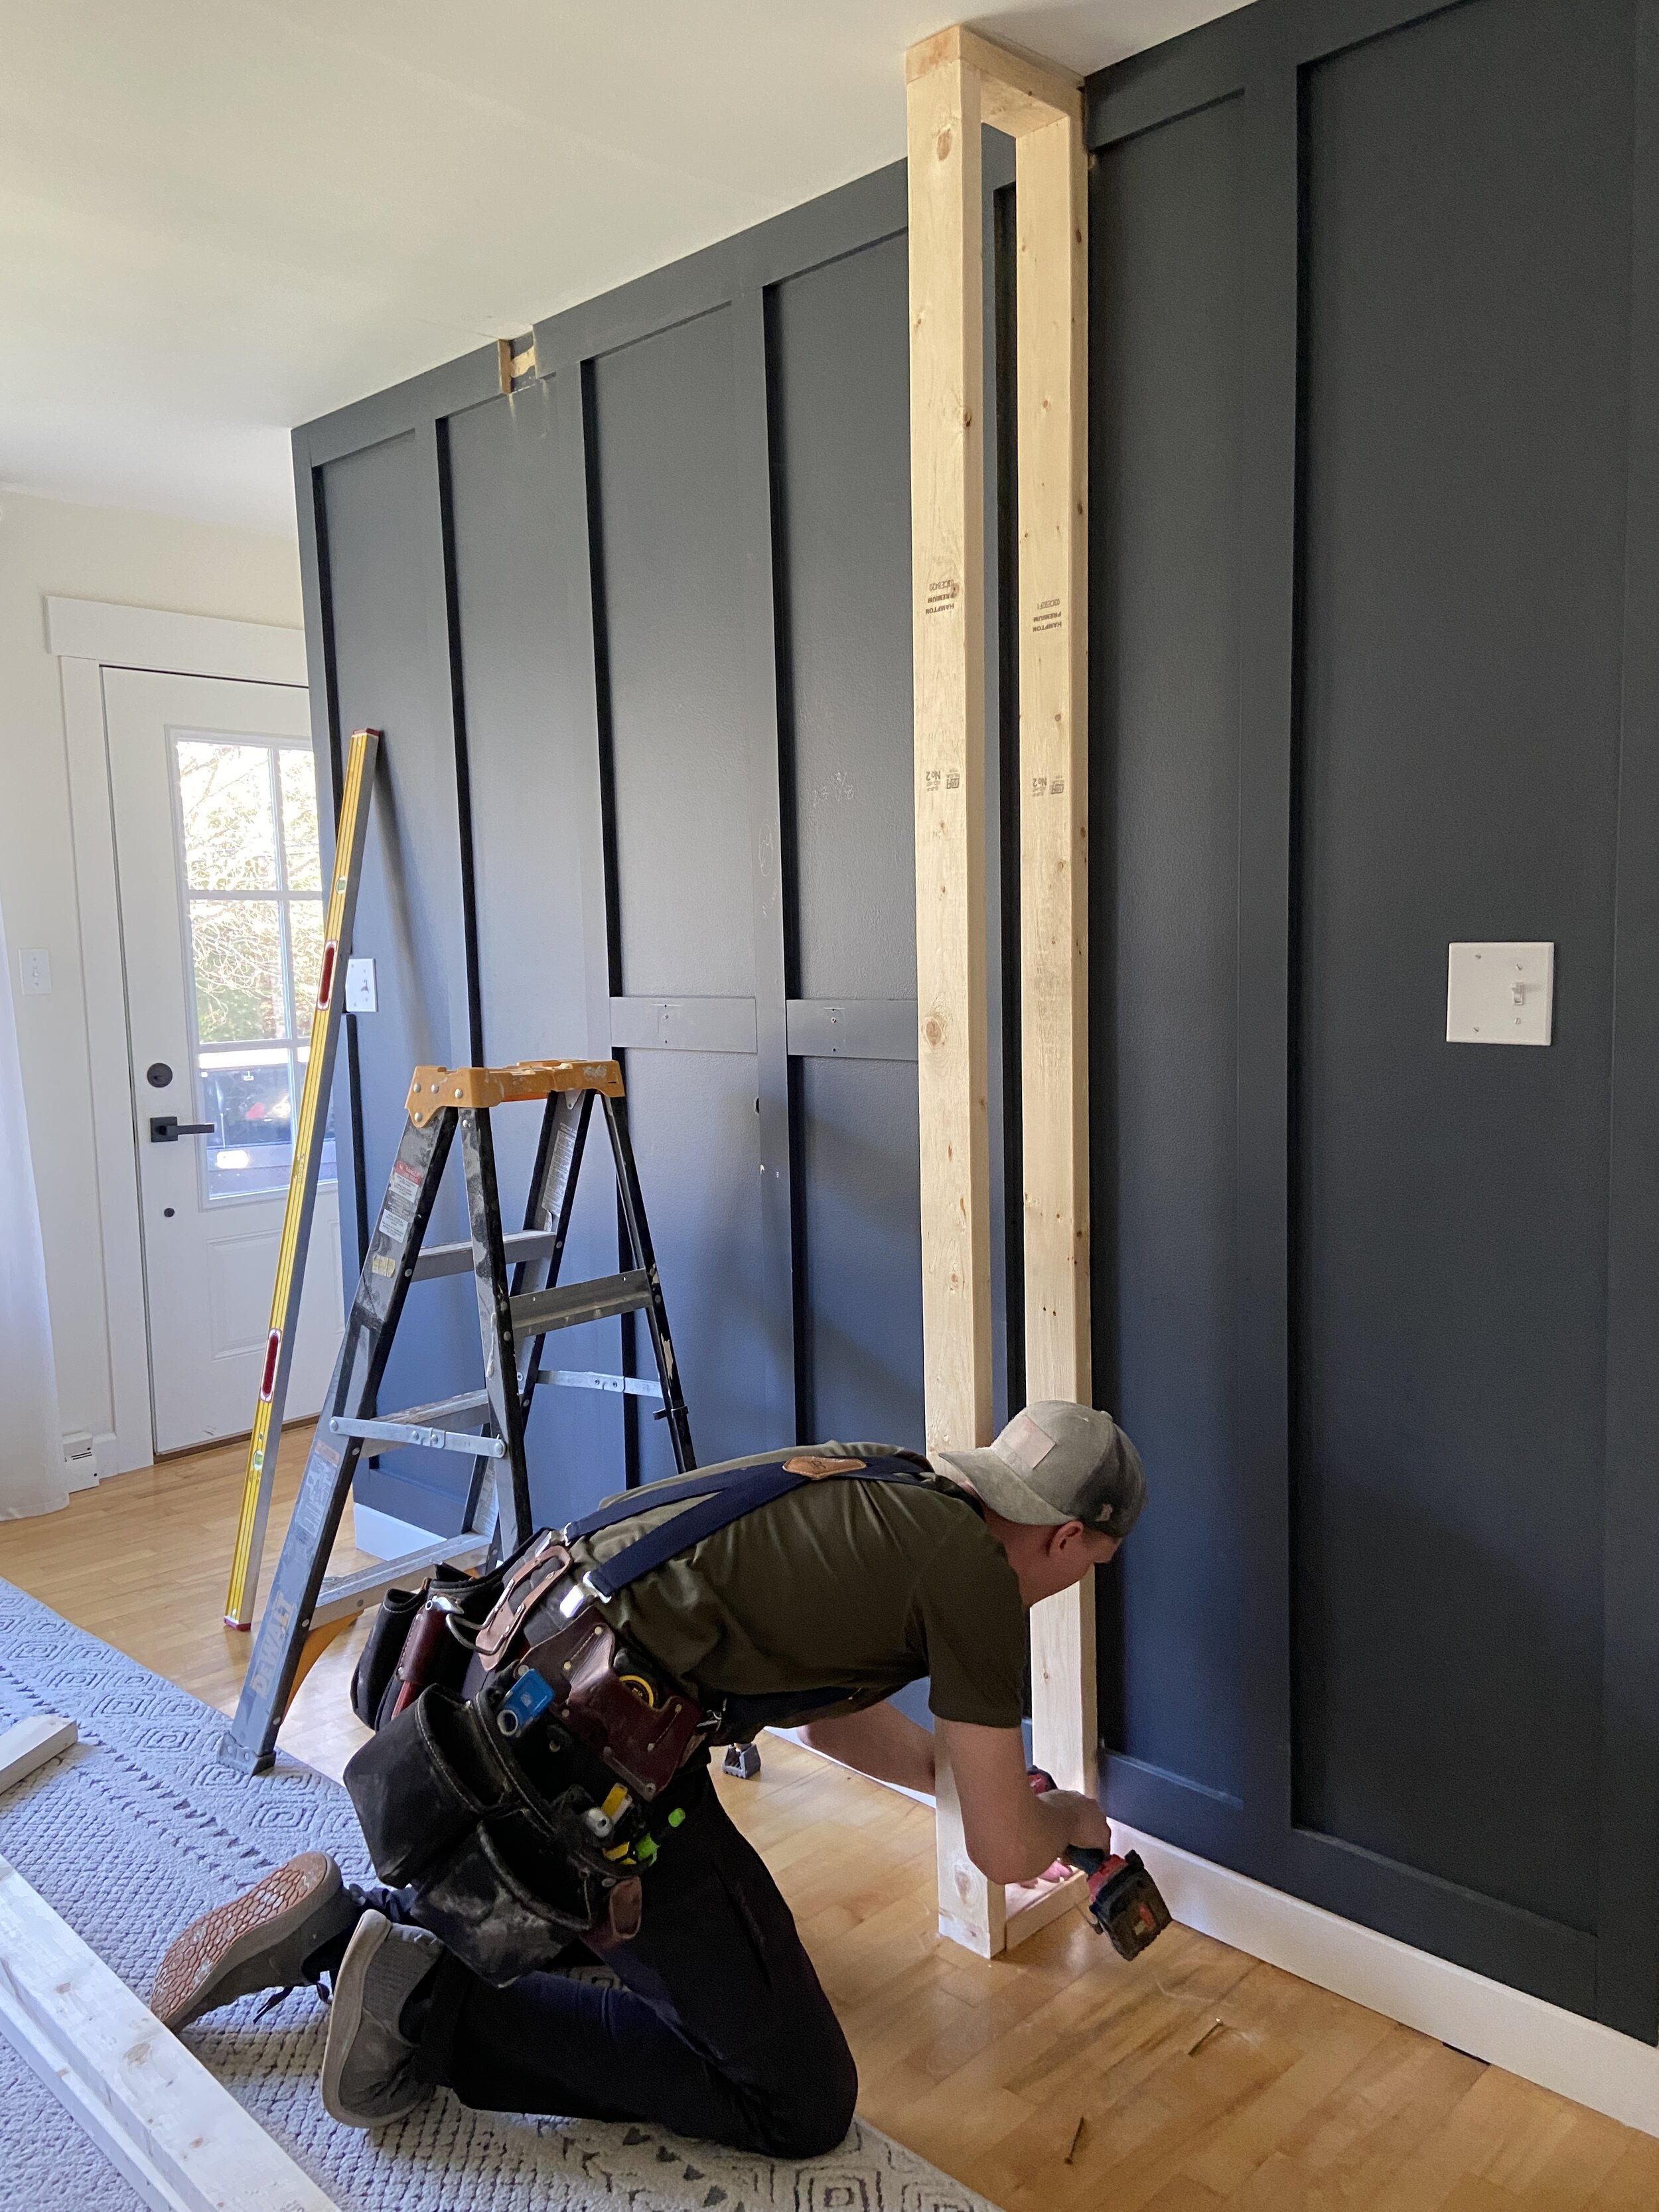

Next we built the cubby for the fireplace to sit in by attaching 2” x 4”s between the side walls, then added additional pieces around the front of the opening for nailing on the hardboard. We decided to have our fireplace sit 10” from the floor. The measurements for this opening will be specific to the size of your fireplace!
Note: Our board and batten wall required us to cut out the top and bottom trims in the area of the built out fireplace so we could attach the framing.

ADDING THE SHIPLAP:
A couple years ago, we installed board and batten on our TV wall and still love it so much, so we wanted to keep it even with adding the fireplace, so when I was brainstorming what the surround of the fireplace would look like, I kept coming back to vertical shiplap—so that’s what we went with!!
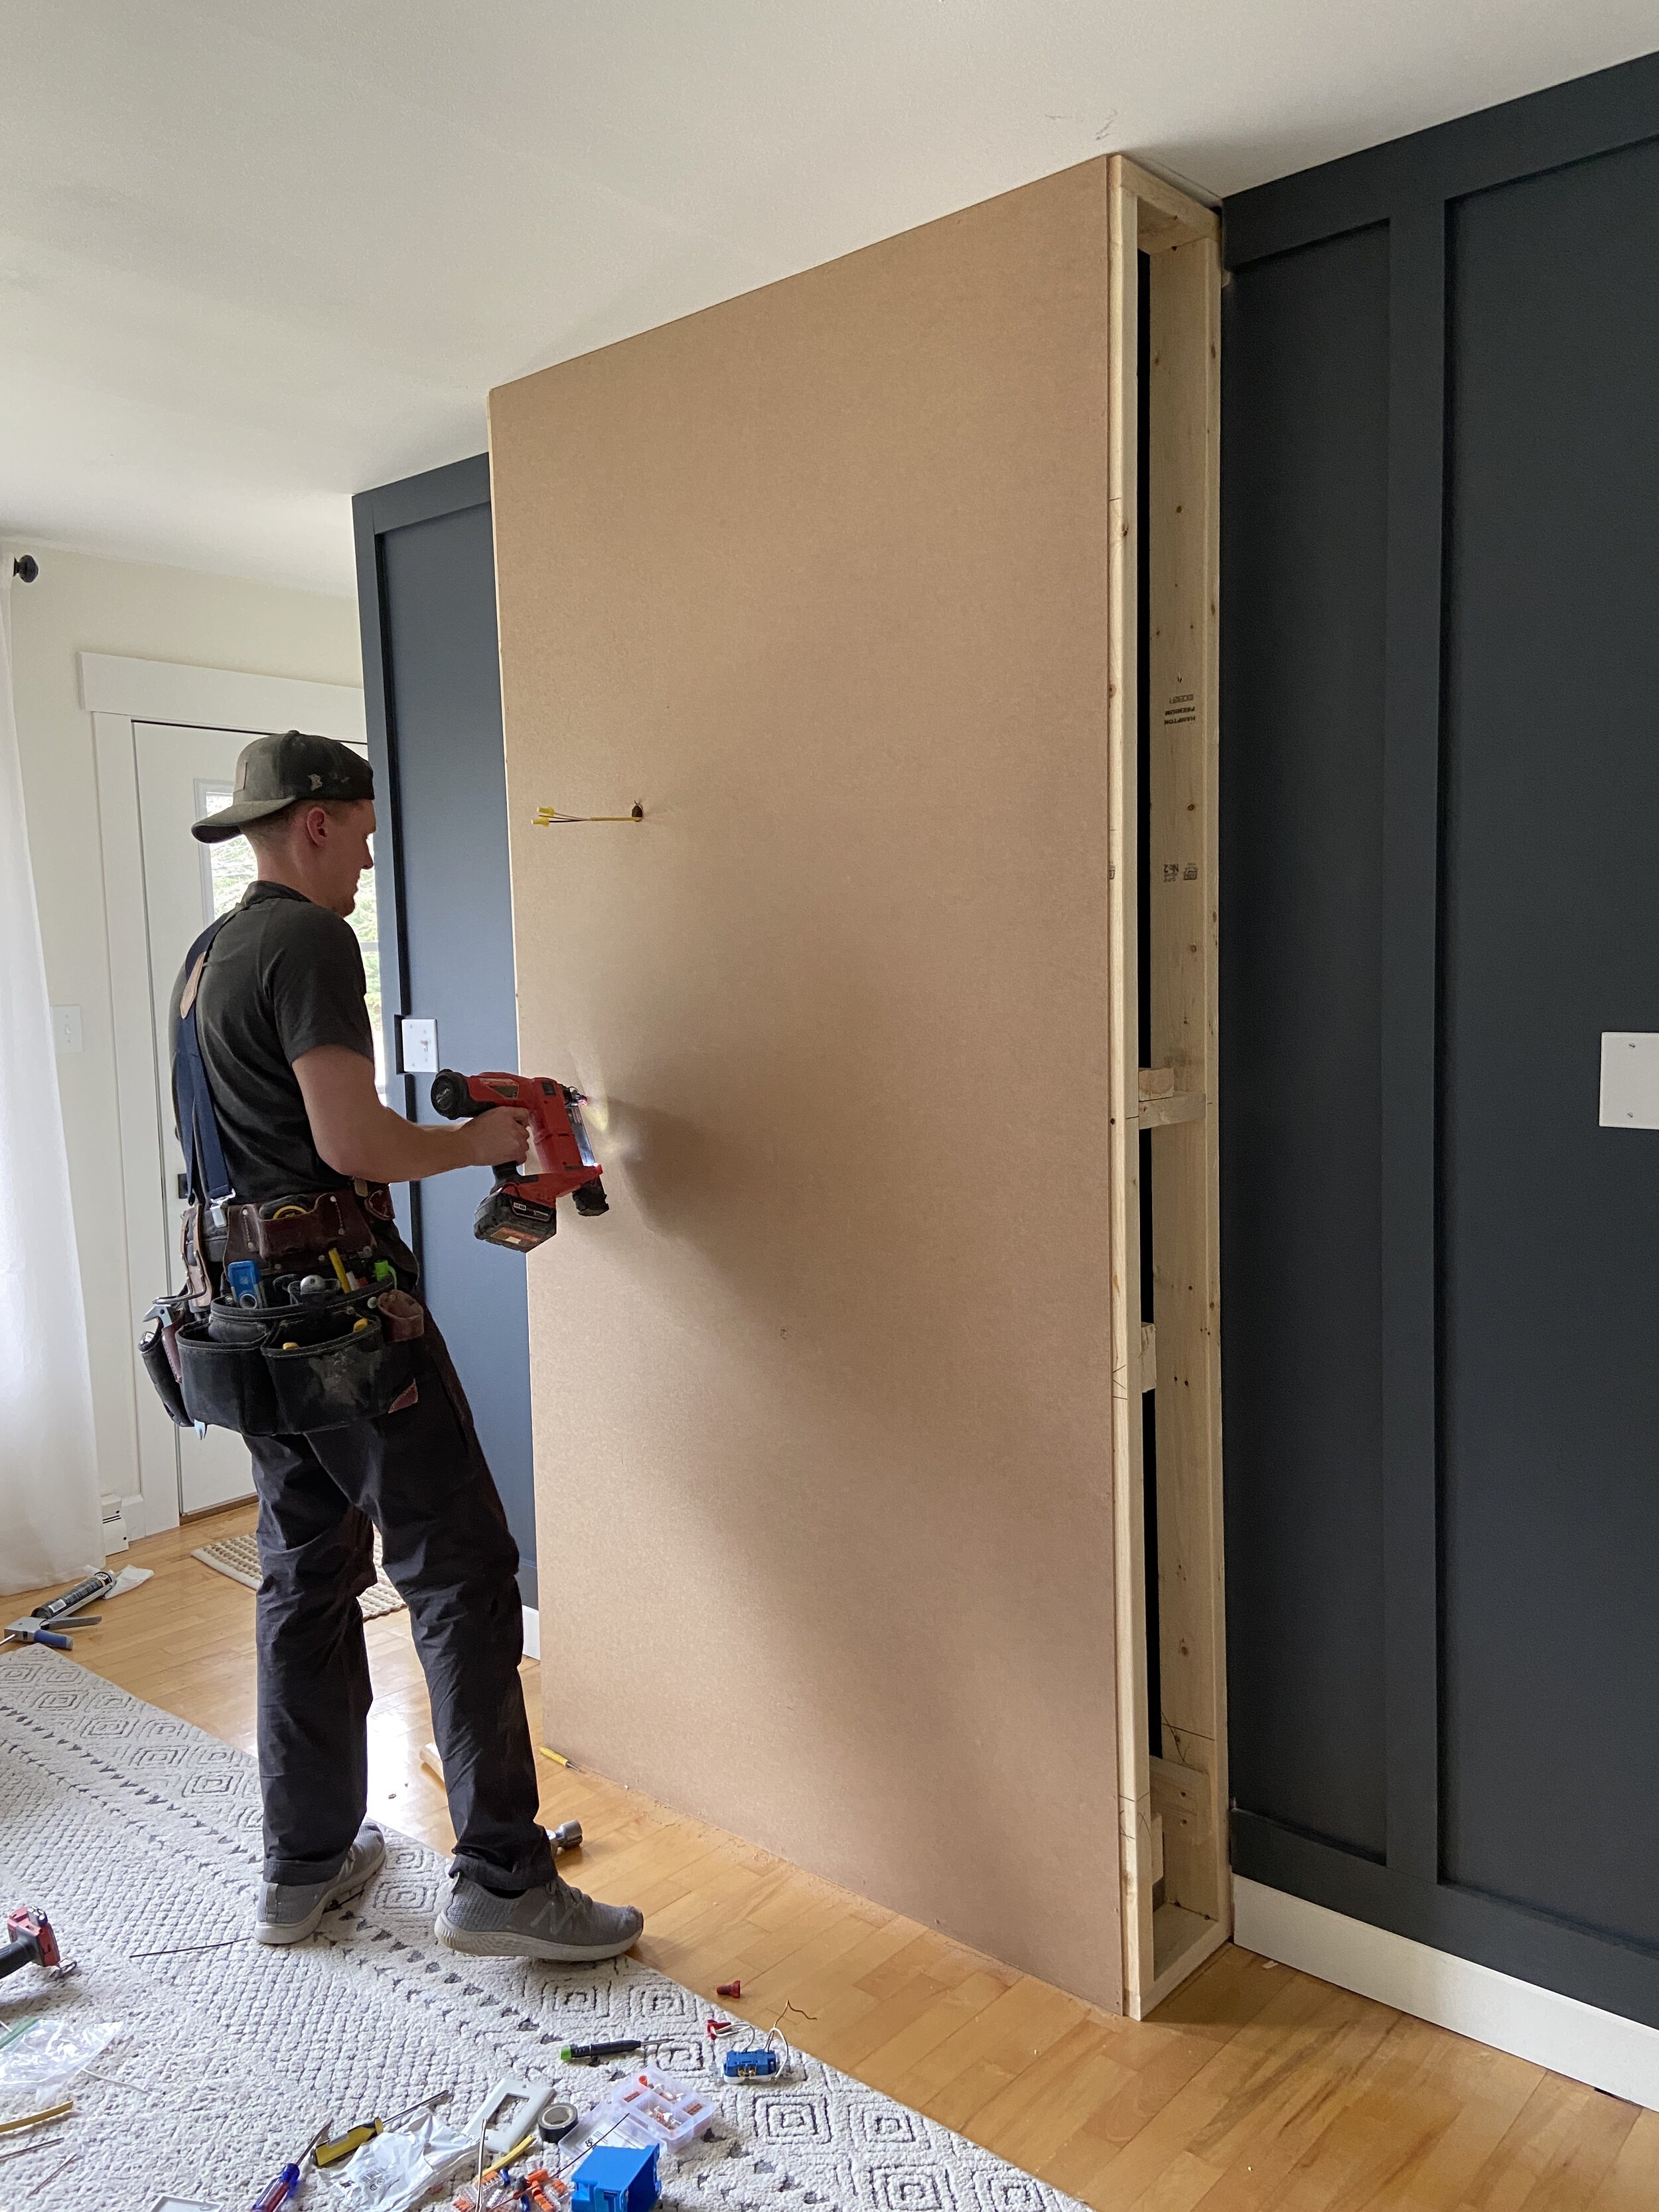
Once the added outlet wire was ran for the TV, it was time to install the front face of our fireplace. We opted to use a tempered 1/4” hardboard to save a little money and create our own shiplap.
We wrapped the fireplace in one layer of the hardboard, then covered it with 6” rips of the same material, spacing them around 1/8” apart and nailing them on with an 18 gauge brad nailer to get the look of vertical shiplap. Then we trimmed the opening with a skill saw and multi tool, and finished up with some 1 1/4” hardboard strips on the sidewalls.


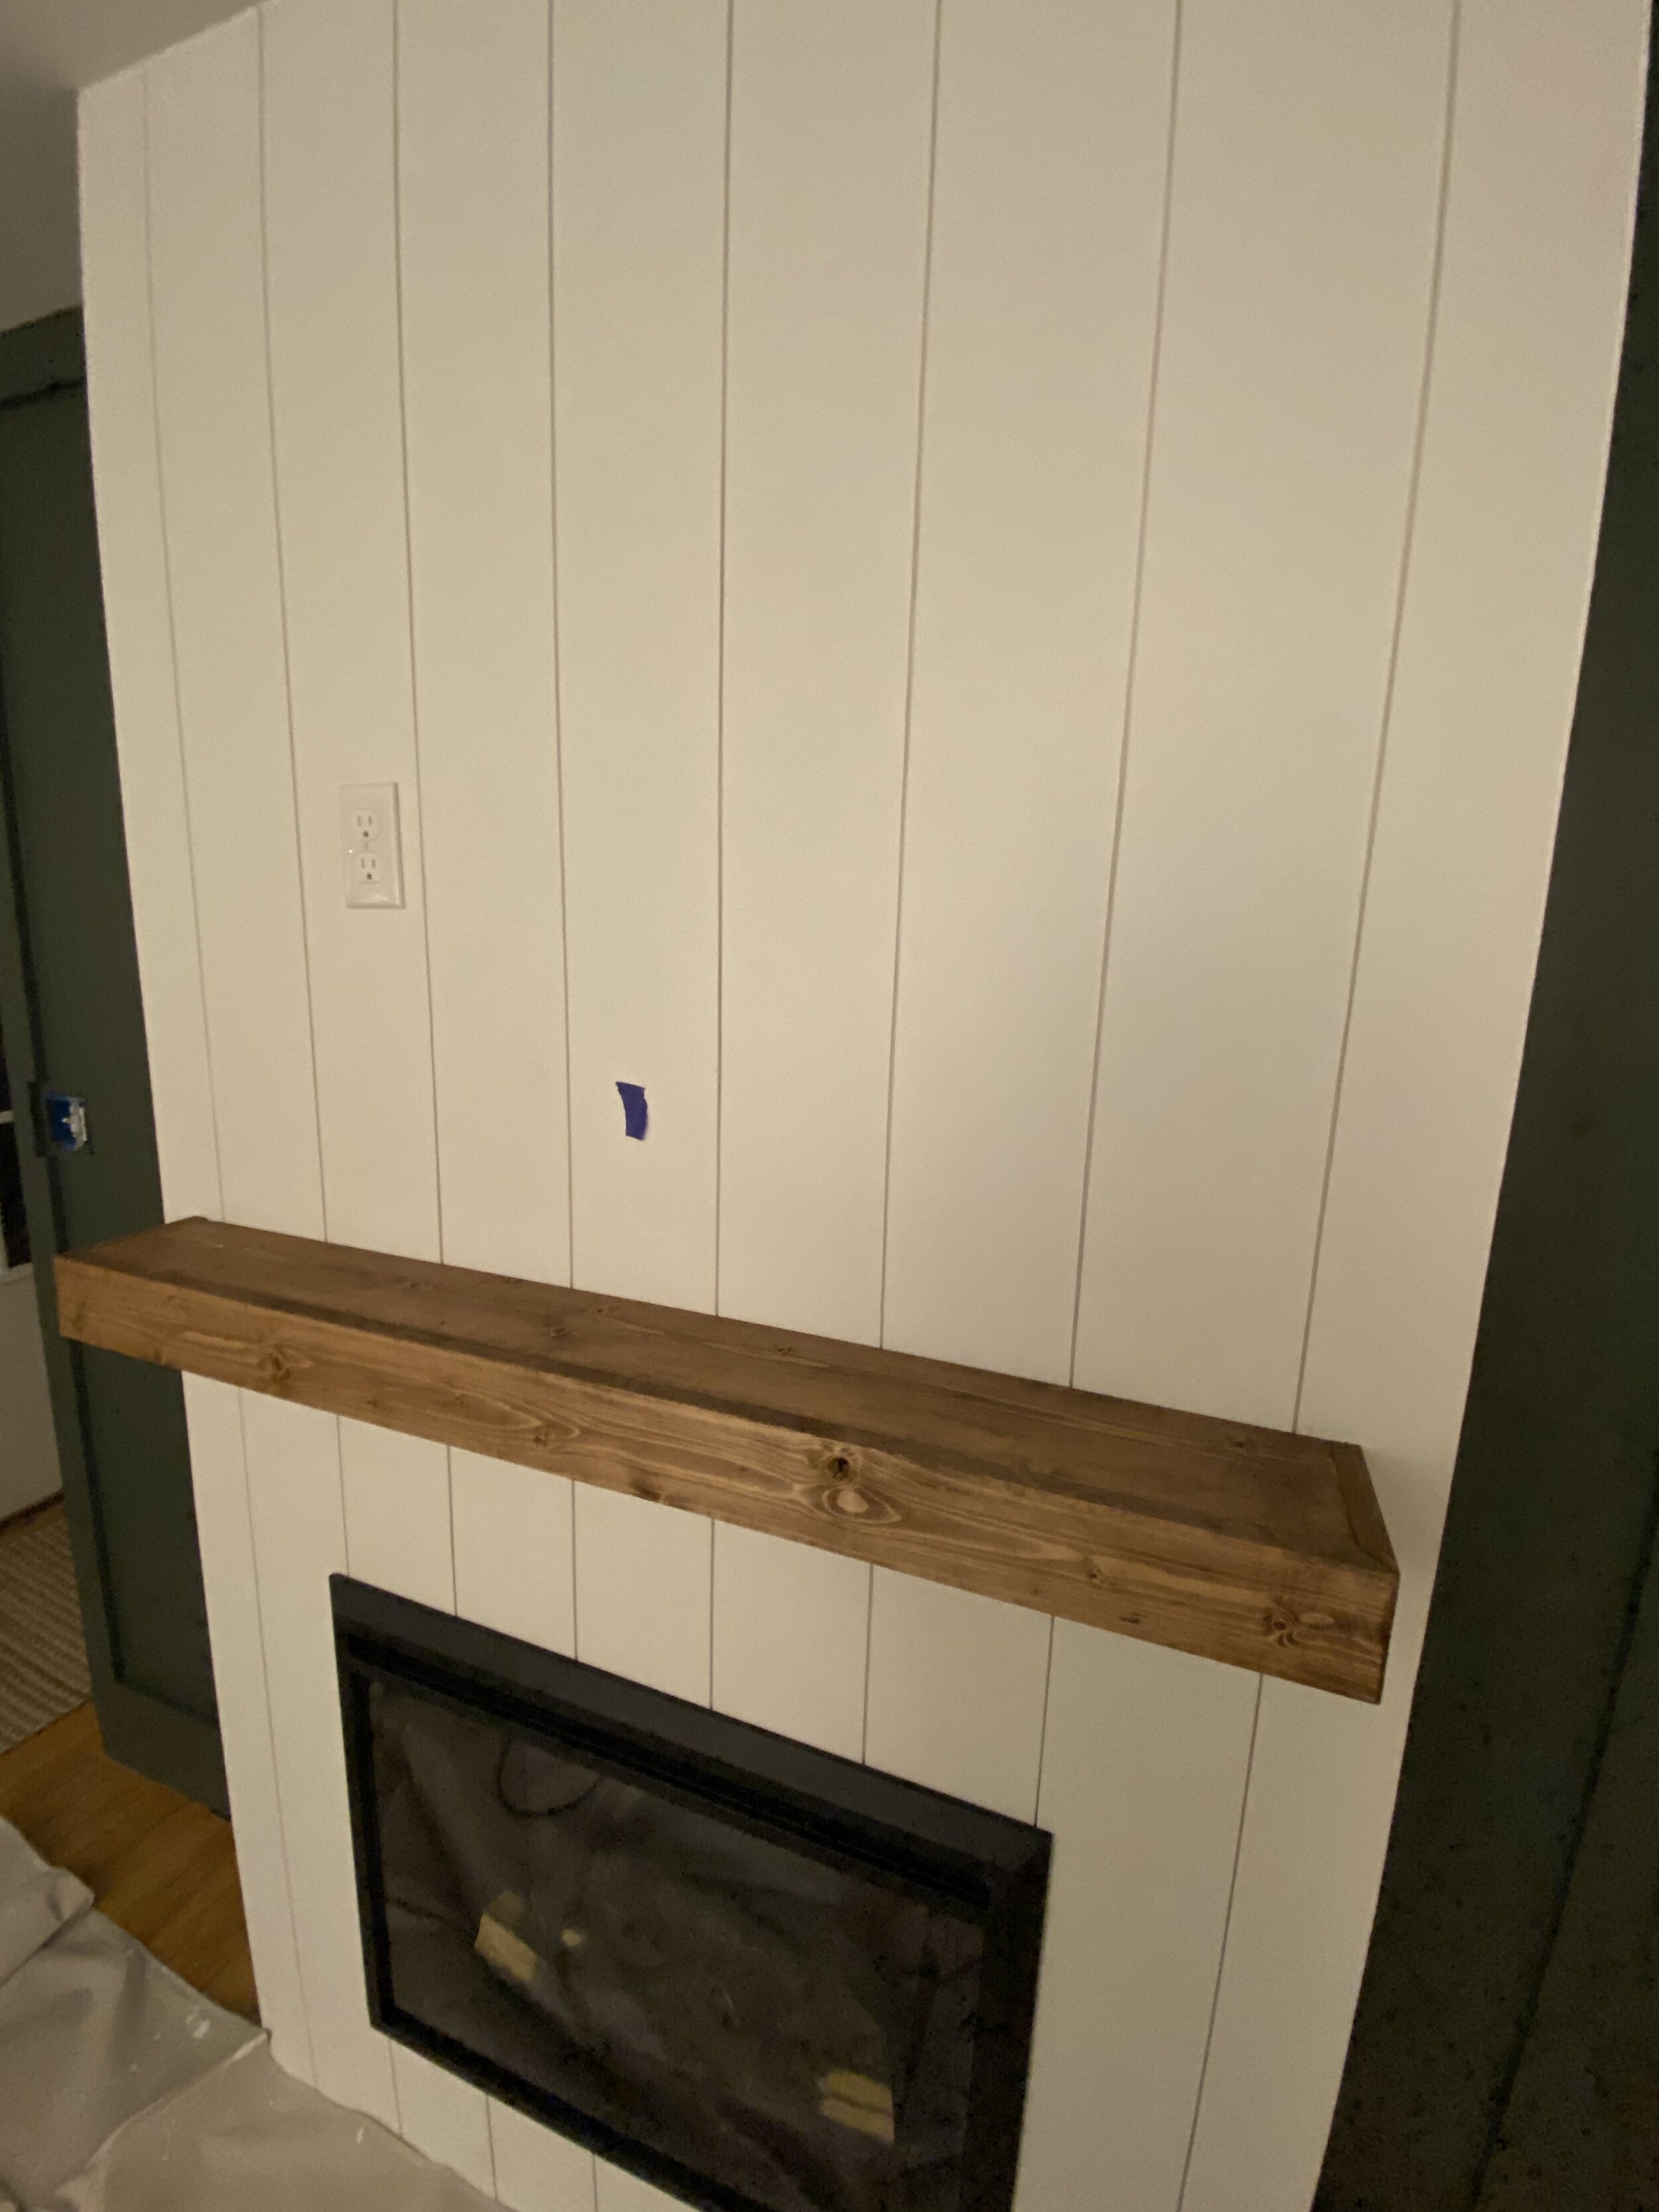
After the vertical shiplap was installed, we filled the nail holes with wood filler, primed the shiplap with stain blocking primer, and then painted it Sherwin Williams Pure White (we did two coats in a satin/eggshell finish)! The trickiest part is getting paint in between the vertical panels, so we would recommend using a small craft paint brush.
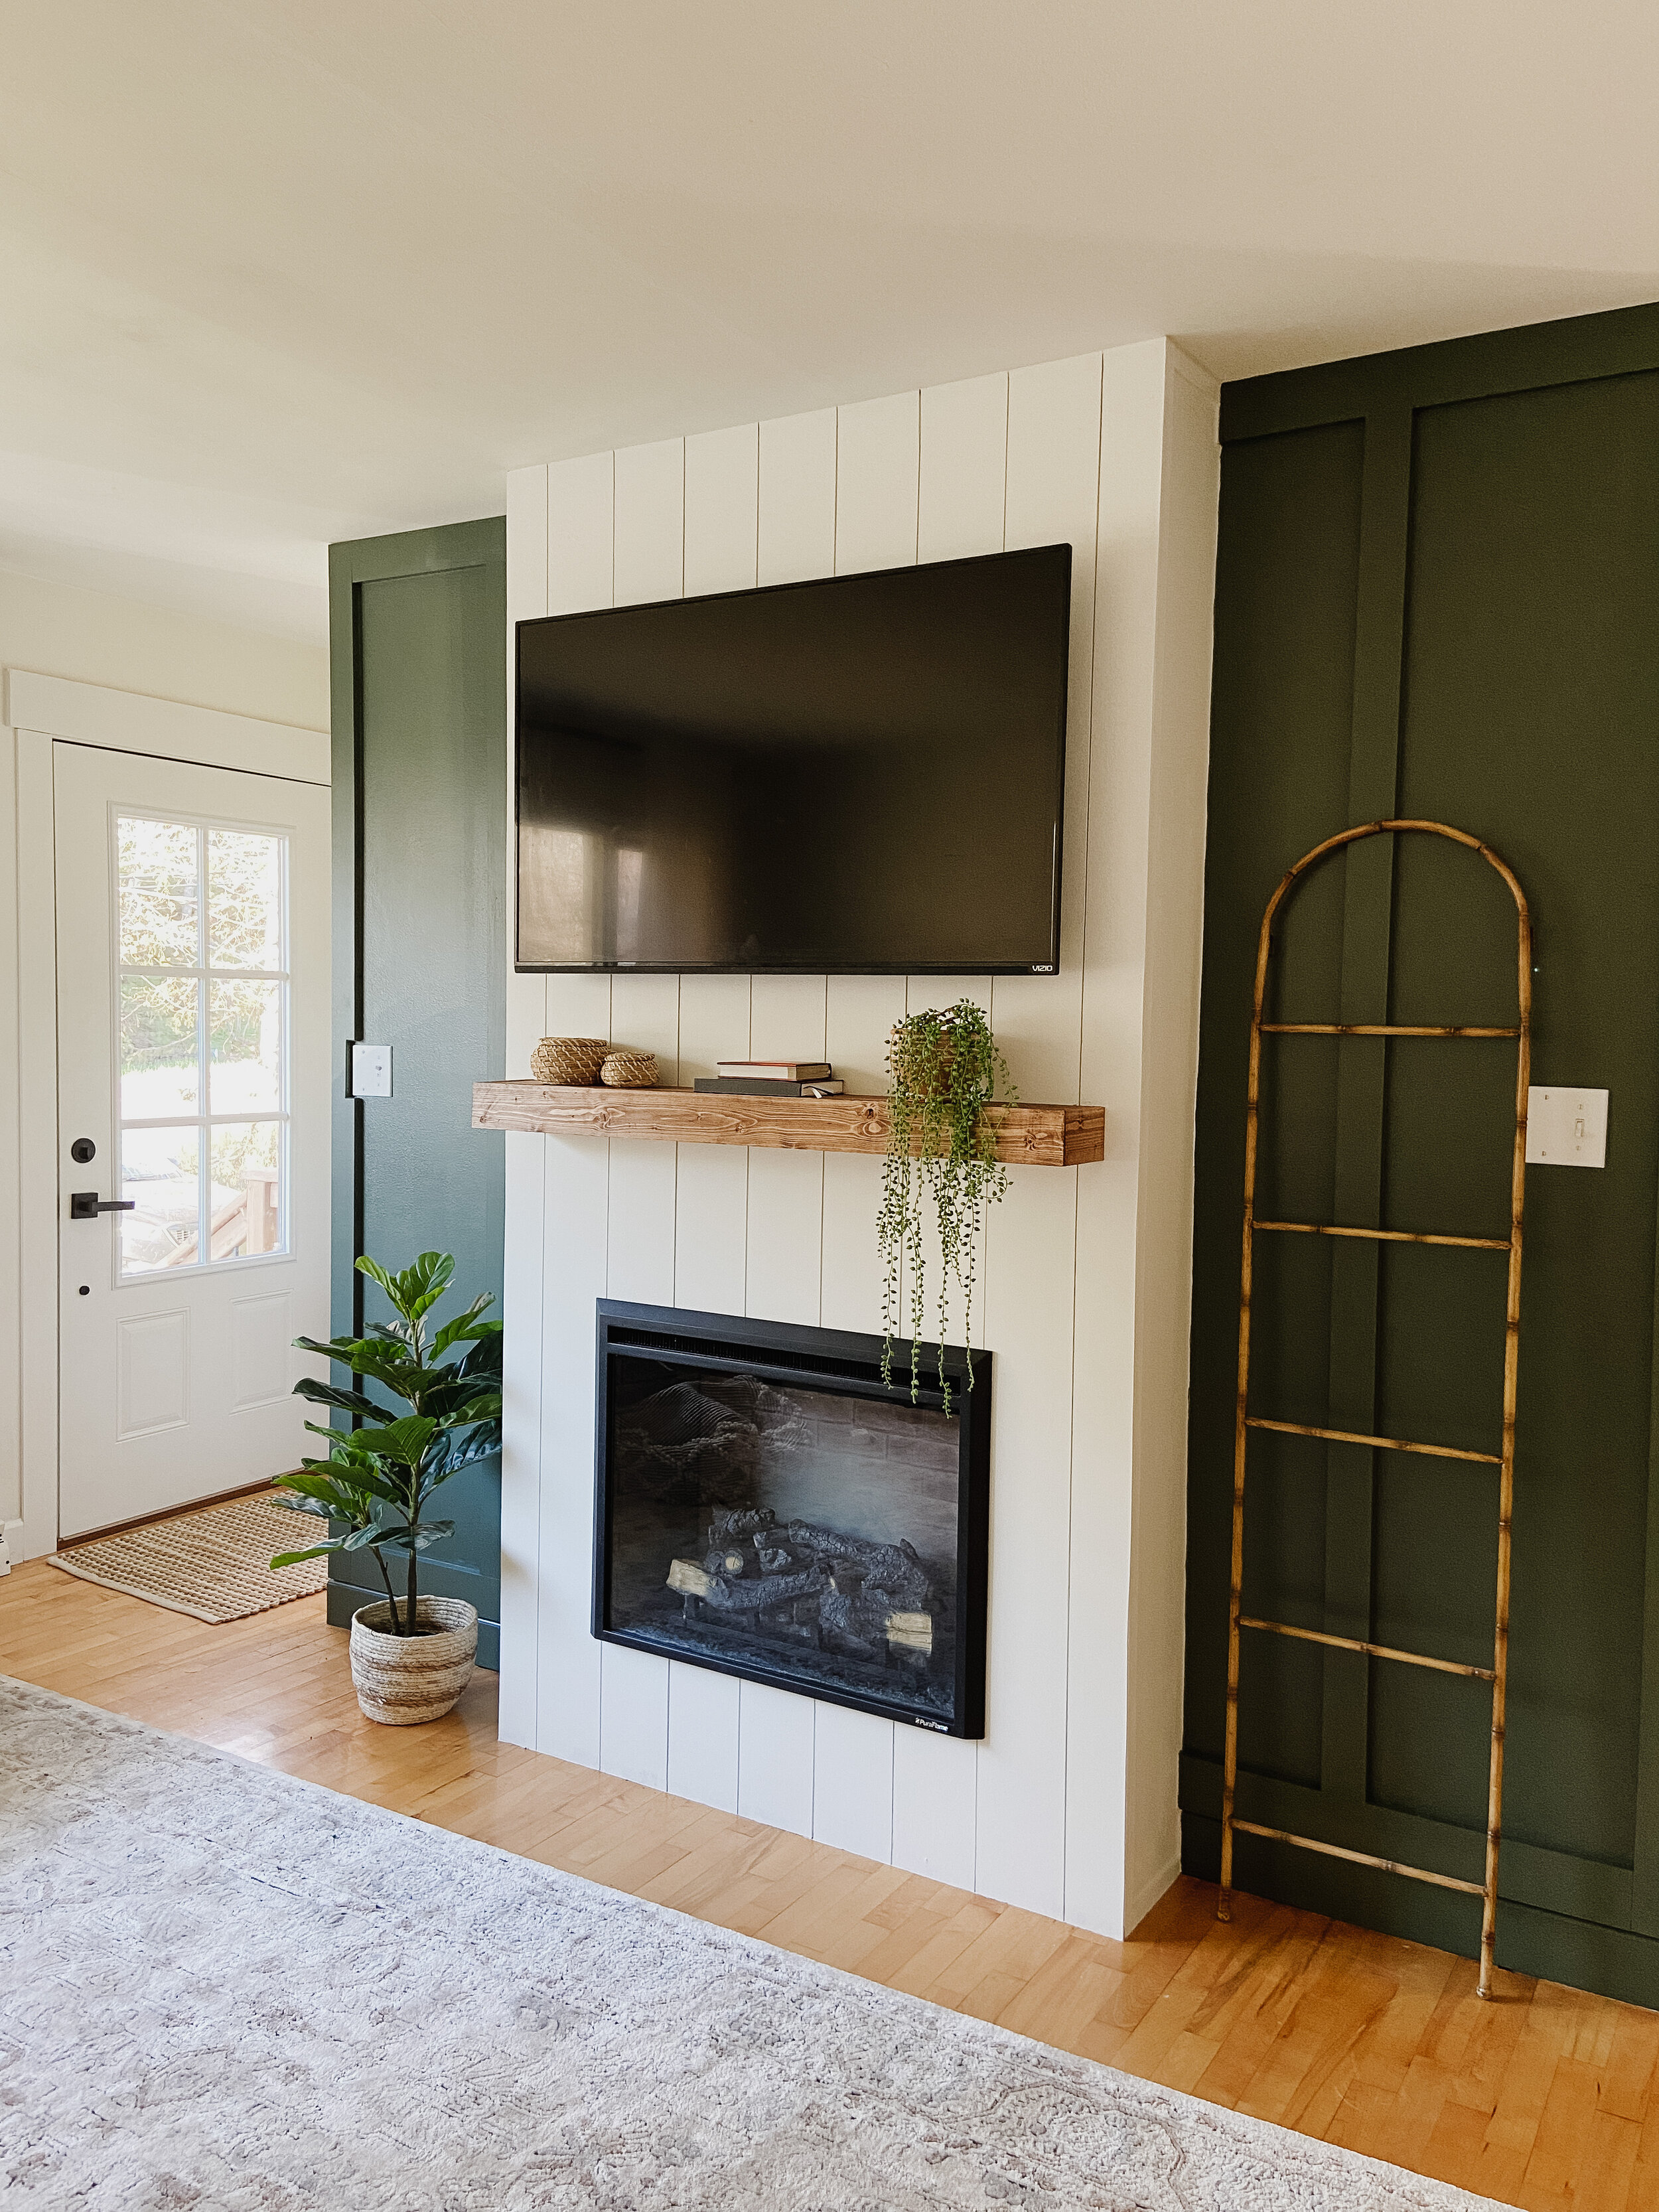
We also freshened up the board and batten wall with a coat of Sherwin Williams Pewter Green!
building THE MANTEL:
Then it was onto the mantel! After some deliberation we decided to set the top of the mantel at 49-1/2 inches from the floor. Jason built this out of two 2” x 6”s ripped down to 5” wide.
We stained the top (with Minwax Special Walnut) and attached it to the fireplace with 7” structural screws through the face. Then we wrapped the 2” x 6” s with 1” x 4” boards and stained them to match. The overall dimensions of the mantel are 46” wide x 5-3/4” deep x 3-1/4” tall.


THE FINISHING TOUCHES:
Lastly, we had to decide where to hang the TV! I wanted to give enough space for adding decor and such to the mantel, but I didn’t want our TV to feel too high on the wall, so we ended up hanging it approximately 8.5 inches above the mantel and I think it’s the perfect distance!! Some day soon I hope to add a fancy Frame TV here, but this will have to do until then! Haha.
Then the final and most fun part IMO—decorating the mantel!! I kept it simple for now with a few things we had around the house, but I’m sure I’ll be switching it up pretty often! :)
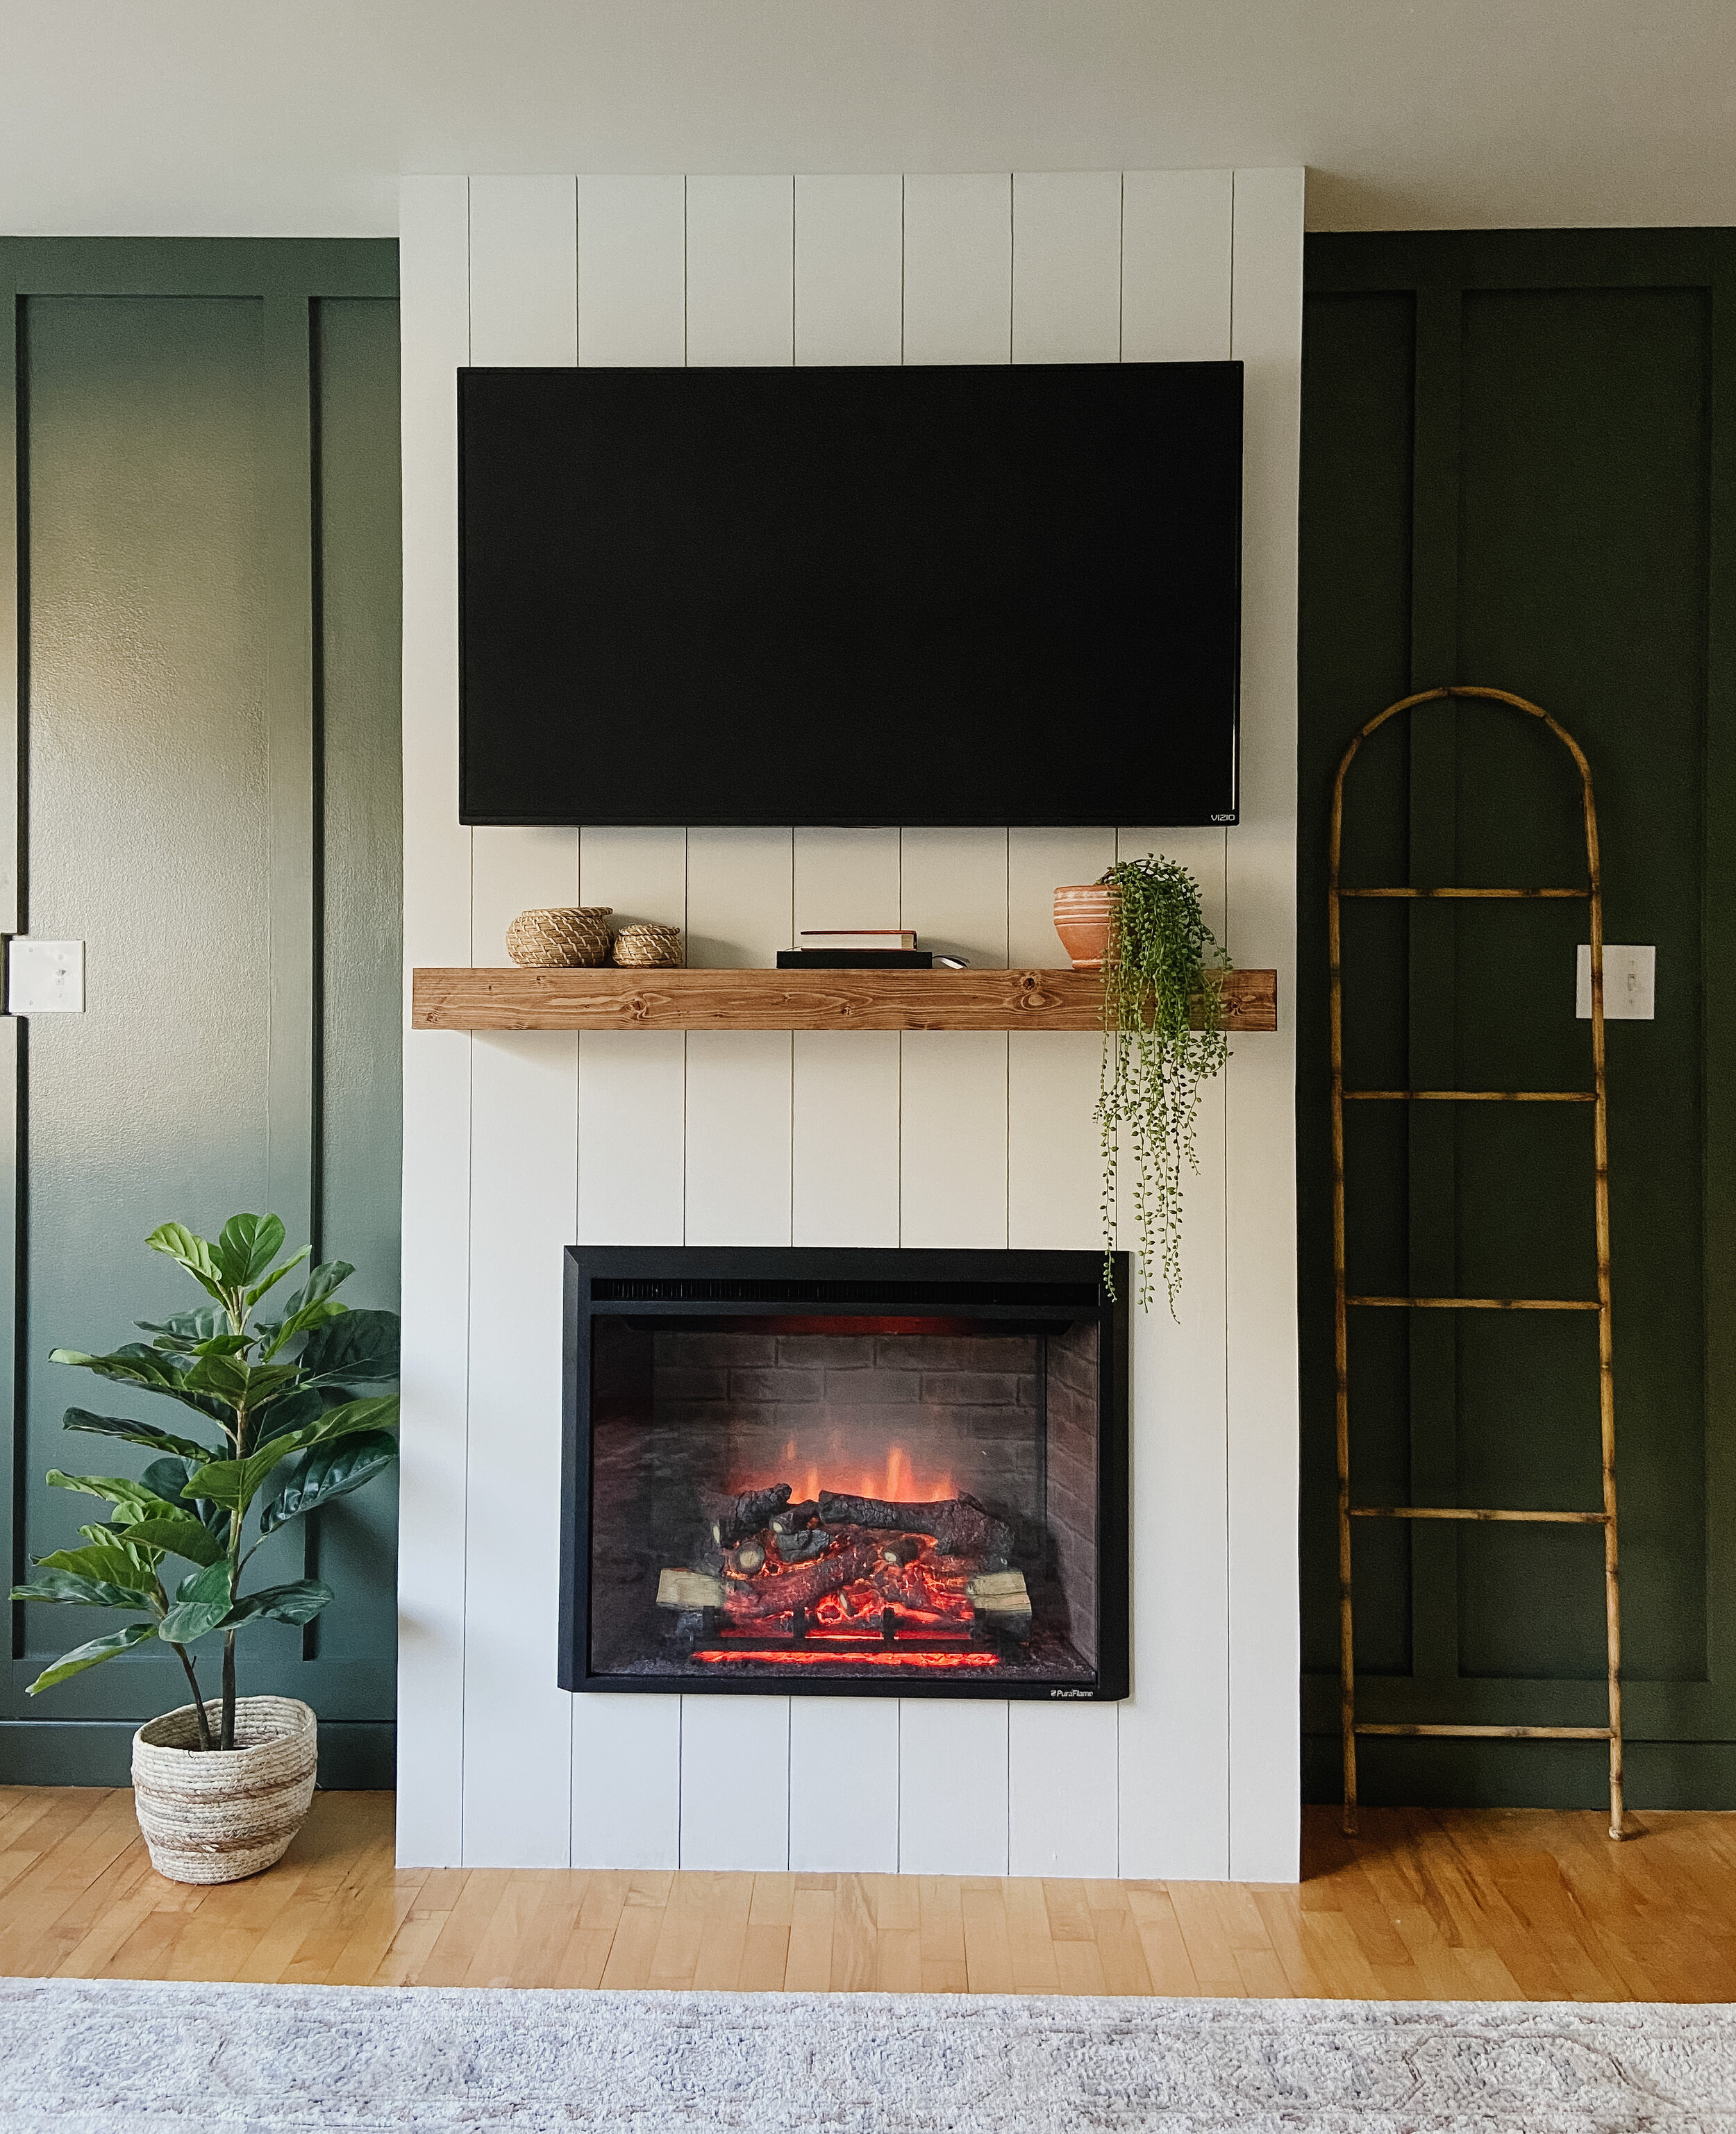
So what do you guys think?! Instant cozy vibes in here and I honestly can’t stop staring!!! If you follow along with us on Instagram, then you’ll know this project creeped into a little living room refresh as well! So be sure to stay tuned for that blog post in the coming weeks!
materials needed:
(10) 8 ft 2” x 4”
(2) 8ft 2” x 6”
(3) 4x8’ 1/4” Tempered Hardboard Sheets
One small box of 3-1/8” Screws
(3) 7” GRK Structural Screws
18 gauge Finish Nails
Wood filler
Painters Caulk
Sherwin Williams Extreme Block Stain Blocking Primer
Paint
Minwax Special Walnut Stain
Total cost: $800
OTHER SOURCES:
Wall paint: Sherwin Williams Pewter Green
Fireplace: Sherwin Williams Pure White
36” Faux Fiddle Leaf Fig Tree (Available in-store at Grace + Gather)